Spritesheets and Tilemaps
In this tutorial, you’ll learn how to:
- Convert an image into a PythonExtra-compatible spritesheet
- Load it and draw individual tiles
- Render a full tilemap made of tile indices
This is perfect for platformers, top-down maps, menus, or puzzle games!
Step 1: Prepare your tileset image
Section titled “Step 1: Prepare your tileset image”Create a tileset using any image editor like Aseprite, Piskel, or even Photoshop.
All tiles must be the same size for example, 16×16 pixels.
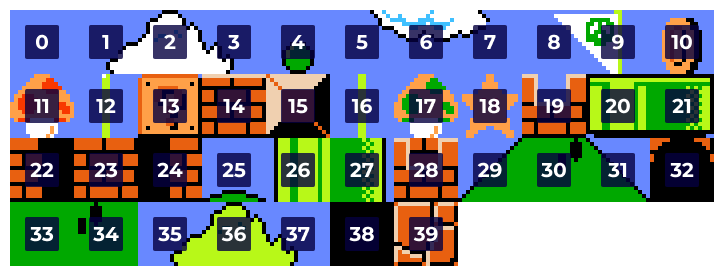
Here’s an example of a classic Mario tileset:

Make sure the image is in .png or .jpg format, and that it’s tightly packed with no spacing between tiles.
Step 2: Convert the image using fxconv
Section titled “Step 2: Convert the image using fxconv”You’ll need the fxconv tool included in the PythonExtra dev tools.
Run this command in your terminal:
python tools/fxconv-main.py --bopti-image super-tiles.jpg \ -o smario_tiles.py \ --cg profile:p4_rgb565 name:image --pyThis will generate a file called smario_tiles.py, which contains the image as a gint.image() object.
You can download a pre-converted version [here](](/wiki/img/python/examples/smario_tiles.py)
Quick breakdown
Section titled “Quick breakdown”| Option | What it does |
|---|---|
--bopti-image | Converts an image file |
-o smario_tiles.py | Output file name (Python module) |
--cg profile:p4_rgb565 | Compression profile for ClassPad (fast & compact) |
name:image | Variable name that will hold the image object |
--py | Export as Python code instead of C |
You’ll end up with something like this inside the file:
from gint import imageimage = image(...) # auto-created with width, height, etc.Step 3: Create a tilemap
Section titled “Step 3: Create a tilemap”A tilemap is just a 2D list of tile indices:
level = [ [0, 1, 2], [0, 3, 4], [0, 0, 0]]Each number tells which tile from the spritesheet to use.
Tile 0 is the top-left tile, tile 1 is the one next to it, and so on, left-to-right, row-by-row.
Step 4: Draw the tilemap using dsubimage
Section titled “Step 4: Draw the tilemap using dsubimage”Here’s the function we’ll use:
def draw_tilemap(tilemap, tileset_img, x0=0, y0=0):    tiles_per_row = tileset_img.width // TILE_SIZE
for y, row in enumerate(tilemap): for x, tile_index in enumerate(row): tile_x = (tile_index % tiles_per_row) * TILE_SIZE tile_y = (tile_index // tiles_per_row) * TILE_SIZE dsubimage(x0 + x * TILE_SIZE, y0 + y * TILE_SIZE, tileset_img, tile_x, tile_y, TILE_SIZE, TILE_SIZE)tiles_per_rowis how many tiles fit horizontally in the imagetile_indexis the number from the map- We compute its position in the image and use
dsubimage()to blit it
Final Code
Section titled “Final Code”
from gint import *from smario_tiles import image as tileset_img
TILE_SIZE = 16SPRITE_WIDTH = tileset_img.width
def draw_tilemap(tilemap, tileset_img, x0=0, y0=0):    tiles_per_row = SPRITE_WIDTH // TILE_SIZE
    for y, row in enumerate(tilemap):        for x, tile_index in enumerate(row):            tile_x = (tile_index % tiles_per_row) * TILE_SIZE            tile_y = (tile_index // tiles_per_row) * TILE_SIZE            dsubimage(x0 + x * TILE_SIZE, y0 + y * TILE_SIZE, tileset_img,                      tile_x, tile_y, TILE_SIZE, TILE_SIZE)
# Sample tilemaplevel = [    [  0,  0,  0,  0,  0,  0,  0,  0,  0,  0,  0 ],    [  0,  1,  2,  3,  0,  0,  0,  1,  2,  3,  0 ],    [  0,  5,  6,  7,  0,  0,  0,  5,  6,  7,  0 ],    [  0,  0,  0,  0,  0,  0,  0,  0,  0,  0,  0 ],    [  0,  0,  0, 14, 13, 14,  0,  0,  0,  0,  0 ],    [  0,  0,  0,  0,  0,  0,  0,  0,  0,  0,  0 ],    [  0,  0,  0,  0,  0,  0,  0,  0,  0,  0,  0 ],    [  0,  0, 14, 14, 14, 14, 14,  0,  0,  0, 15 ],    [  0,  0,  0,  0,  0,  0,  0,  0,  0, 15, 15 ],    [ 35, 36, 37,  0,  0,  0,  0,  0, 15, 15, 15 ],    [ 39, 39, 39, 39, 39, 39, 39, 39, 39, 39, 39 ]]
# Rundclear(C_WHITE)draw_tilemap(level, tileset_img)dupdate()getkey()Need help converting images or slicing sprite animations?
Ask the 👨💻 PythonExtra ChatGPT!