Colors and Shapes
Now that you’ve drawn your first rectangle, let’s go further and explore more shapes and colors.
You’ll learn how to:
- Draw rectangles and circles in different colors
- Create gradients
- Use helper functions like
dvline,dhline, anddlineto draw more efficiently
All of this runs fast and smoothly thanks to gint.
1. Drawing Colored Rectangles: Flags!
Section titled “1. Drawing Colored Rectangles: Flags!”Let’s start with some rectangles in different colors.
We’ll draw mini flags of France and Germany using colored rectangles.
Mini France Flag
Section titled “Mini France Flag”import gint
gint.dclear(gint.C_WHITE)
# Blue, white, red vertical barsgint.drect(10, 10, 30, 50, gint.C_RGB(0, 0, 31)) # Bluegint.drect(30, 10, 50, 50, gint.C_WHITE) # Whitegint.drect(50, 10, 70, 50, gint.C_RGB(31, 0, 0)) # RedEach drect() call draws a vertical bar of the flag.
The C_RGB(r, g, b) function lets you mix any color.
Mini Germany Flag
Section titled “Mini Germany Flag”# Black, red, yellow horizontal stripesgint.drect(80, 10, 130, 20, gint.C_BLACK)gint.drect(80, 20, 130, 30, gint.C_RGB(31, 0, 0)) # Redgint.drect(80, 30, 130, 40, gint.C_RGB(31, 31, 0)) # YellowThis one uses horizontal bars instead. Simple!
2. Drawing Circles and Ellipses
Section titled “2. Drawing Circles and Ellipses”You can draw filled or unfilled shapes using dcircle() and dellipse().
Filled and Unfilled Circles
Section titled “Filled and Unfilled Circles”gint.dcircle(30, 80, 10, gint.C_BLACK, gint.C_WHITE) # Filledgint.dcircle(60, 80, 10, gint.C_NONE, gint.C_BLACK) # Outline only(x, y, r)is the center and radius- First color is the fill
- Second is the border
Use C_NONE to skip the fill or border.
Filled and Unfilled Ellipses
Section titled “Filled and Unfilled Ellipses”gint.dellipse(100, 70, 120, 90, gint.C_RGB(28, 28, 31), gint.C_BLACK)gint.dellipse(130, 70, 150, 90, gint.C_NONE, gint.C_BLUE)- You define the ellipse using a rectangle:
(x1, y1)to(x2, y2) - Again, choose fill and border colors
3. Drawing a Gradient Rectangle (Y Axis Only)
Section titled “3. Drawing a Gradient Rectangle (Y Axis Only)”Let’s draw a rectangle pixel by pixel, changing the color as we go vertically.
for y in range(0, 32): color = gint.C_RGB(0, y, y) # From black to cyan for x in range(10, 40): gint.dpixel(x, 100+y, color)What’s happening?
Section titled “What’s happening?”- We loop over y, from top to bottom
- For each row, we pick a color
- Then we draw that row using individual pixels
This is how gradients are built: same row = same color.
4. Drawing a Diagonal Gradient (X and Y Based)
Section titled “4. Drawing a Diagonal Gradient (X and Y Based)”Let’s now build a second rectangle where the color depends on both x and y.
for y in range(0, 32): for x in range(0, 32): r = x g = y b = 31 - r color = gint.C_RGB(r, g, b) gint.dpixel(60+x, 100+y, color)Now the color changes horizontally and vertically, producing a 2D gradient. Remember that C_RGB uses RGB555, so 31 is the max color value and 0 the minimum.
5. Drawing Gutter Lines (Helper Functions)
Section titled “5. Drawing Gutter Lines (Helper Functions)”Use dvline() and dhline() to draw fast vertical/horizontal lines.
gray = gint.C_RGB(18, 18, 18)
# Vertical "gutters"gint.dvline(10, gray)gint.dvline(gint.DWIDTH-10, gray)
# Horizontal linesgint.dhline(10, gray)gint.dhline(gint.DHEIGHT-10, gray)
These are perfect for drawing menus, borders, and separators.
6. Drawing a Box Using Lines
Section titled “6. Drawing a Box Using Lines”Let’s draw a simple outlined square using dline().
gint.dline(150, 200, 180, 200, gint.C_BLACK) # Topgint.dline(180, 200, 180, 230, gint.C_BLACK) # Rightgint.dline(180, 230, 150, 230, gint.C_BLACK) # Bottomgint.dline(150, 230, 150, 200, gint.C_BLACK) # LeftThis draws a rectangle manually, line by line.
You can use this to draw any polygon or shape.
Final Code Block
Section titled “Final Code Block”Here’s a simplified version that runs everything:
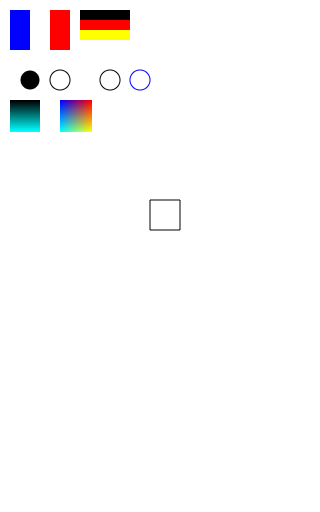
import gint
gint.dclear(gint.C_WHITE)
# Flagsgint.drect(10, 10, 30, 50, gint.C_RGB(0, 0, 31))gint.drect(30, 10, 50, 50, gint.C_WHITE)gint.drect(50, 10, 70, 50, gint.C_RGB(31, 0, 0))
gint.drect(80, 10, 130, 20, gint.C_BLACK)gint.drect(80, 20, 130, 30, gint.C_RGB(31, 0, 0))gint.drect(80, 30, 130, 40, gint.C_RGB(31, 31, 0))
# Circlesgint.dcircle(30, 80, 10, gint.C_BLACK, gint.C_WHITE)gint.dcircle(60, 80, 10, gint.C_NONE, gint.C_BLACK)
# Ellipsesgint.dellipse(100, 70, 120, 90, gint.C_RGB(28, 28, 31), gint.C_BLACK)gint.dellipse(130, 70, 150, 90, gint.C_NONE, gint.C_BLUE)
# Gradient Yfor y in range(0, 32):    color = gint.C_RGB(0, y, y)  # From black to cyan    for x in range(10, 40):        gint.dpixel(x, 100+y, color)
# Gradient XYfor y in range(0, 32):    for x in range(0, 32):        r = x        g = y        b = 31 -r        color = gint.C_RGB(r, g, b)        gint.dpixel(60+x, 100+y, color)
# Gutter linesgray = gint.C_RGB(18, 18, 18)gint.dvline(10, gray)gint.dvline(gint.DWIDTH-10, gray)gint.dhline(10, gray)gint.dhline(gint.DHEIGHT-10, gray)
# Box with linesgint.dline(150, 200, 180, 200, gint.C_BLACK)gint.dline(180, 200, 180, 230, gint.C_BLACK)gint.dline(180, 230, 150, 230, gint.C_BLACK)gint.dline(150, 230, 150, 200, gint.C_BLACK)
gint.dupdate()gint.getkey()
What’s next?
Section titled “What’s next?”Next up: Let’s try to make them move !